Craft a Heart

Jen's Friends - Heart Pillows for Mastectomies Jen’s Friends Mastectomy Pillow https://www.facebook.com/Jensfriendsmastectomypillow/photos_stream

A few months back I came across Jen’s Friends who are a group of friends that started a drive for people to make heart shape cushions to help women and men after a mastectomy. They have a pattern that can be downloaded and would like people who can to sew the cushions together as instructed on the download. Cushions can be sent without stuffing if postage costs are an issue. They prefer 100% cotton fabric to be used. If you have spare fabric, ribbons etc. than they may be able to make use of them. If you know someone who may benefit from using one of these pillows please also get in touch with them. They can be contacted through Facebook: https://www.facebook.com/Jensfriendsmastectomypillow/

It is a wonderful thing these group of women are doing and it would be great if we could get more people to take part. To Craft a Heart would be a wonderful thing!

I promised months back to post their link and send in some stitched hearts that I would make myself but I was unable to do so till now as I have had a bad succession of flares that have meant I have been confined to bed for most of my time and unable to sit at my sewing machine. I feel incredibly disappointed in myself that I have yet to fulfil what I intended to do months back but I have ten pairs of hearts cut-out and pinned to make 10 cushions so that when I am able to sew again at the machine I can be up and running in no time. I am increasing my activity levels day by day, little by little so I hope it won’t be too long before I am back at my machine – I so miss it! So apologies Jen’s Friends.

Thank you x

100 Likes

Reached 100 likes! Thank you so much. Sew Ellie’s Imaginary Friend is a newish blog so thanks to everyone who has taken the time to click like. x

I do like that when this 100 picture pops up it looks just like a sticker and it takes me back to the same thrill I used to get as a kid when you got a star sticker in your work book.

First iPad Case – Menswear

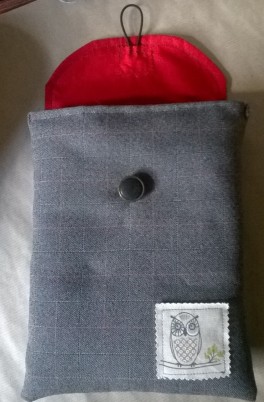
This is my first attempt at an iPad case for my Great Uncle’s birthday. I borrowed an iPad sleeve from someone else so I could take the appropriate measurements for it as I don’t have an iPad so I hope it fits! I really like the menswear style fabric but I was dreading stitching it as it’s some form of polyester I think (one of my unknown random offcuts that I’ve picked up from somewhere) but I just used my walking foot and it was fine.

It was the first time that I used a flap and sketched it out myself so it’s not quite perfect. I also wish that I used a firmer wadding or maybe even foam as it’s a bit squishy. I also used an elasticated loop from a hair elastic for the first time after seeing Debbie Shore use one on Create and Craft the other the day.

Overall I like the menswear look but will need to tweak the finer details.

case_copy open case_copy

Twiddlemuff for dementia patients

A friend of mine alerted me to a call that an English hospital has made for people to knit twiddlemuffs for dementia patients. These muffs contain items and textures that people with advanced dementia can feel and play with which can stimulate cognitive functions and help with anxiety. Unfortunately I can’t knit but my mum who works with dementia patients said that the wards sometimes use activity blankets/quilts that have a similar effect so I’ve decided to make a quilt for my mum’s ward. I’m going to do some research as to what the quilt should contain but I’m so excited about it. My Nan has Alzheimer’s disease and as she was the one that encouraged my crafty life it would be nice if I could use those skills she taught me to help others with her condition and those with dementia.

Below is a link to the knitting pattern for the twiddlemuff and the contact details of the organisation behind it.

http://www.warringtonandhaltonhospitals.nhs.uk/_store/documents/twiddlemuffsknittingpattern.pdf

Mini Quilt – Major Problems

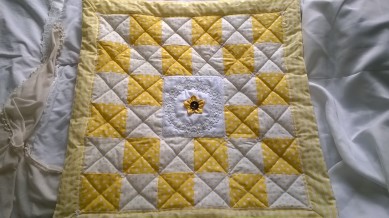
This is my mini quilt which is about 28×28 inches. It was a slow process due to my first blunder – not cutting accurately. Having seen a few quilts I figured that accuracy is quite important so I invested in a large quilting ruler and a cutting mat. I find cutting almost anything difficult because of my chronic lack of strength but thought that I should be ok with light cottons and a rotary cutter – but no, I couldn’t keep the ruler still nor apply much pressure through the cutter often swerving in the wrong direction, so my mum offered to do it for me. My mum’s help, whilst kind, turned out to be a hindrance as she rowed with the ‘confusing’ ruler and had a roguish attitude towards what constitutes a 1/4 inch.

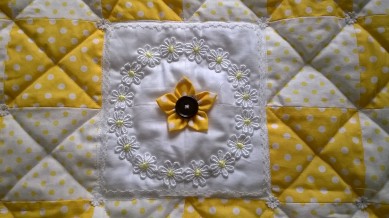
When I started to assemble the squares the inaccuracies that seemed minor suddenly became major. I should’ve stopped and recut but I stubbornly persevered and adjusted as I went hoping that it was just one or two squares that were out but it was nearly all the squares that were off so the lines aren’t that straight. The wonky patches are disguised a little as I quilted diagonally to them. I hand-stitched the daisy trim and dotted small lace daisies around the quilt. I used a clover kanzashi flower template for the flower in the middle, you stitch around and through a template and it’s so quick and easy. I didn’t realise how awkward it is to manoeuver all that wadded material, it was so heavy and this is just a mini quilt, I have no idea how the big quilters manage. Despite my trials I did enjoy making it and I hope to make some more but next time I will cut the pieces myself how ever long it takes.

WP_20150526_16_20_42_Pro Love polka dots!

WP_20150526_16_20_55_Pro

WP_20150526_16_21_31_Pro

Vintage and Antique Textile Goodies

There was a lot of fabric on sale at the Makit Fair but as some of the sellers were local to me and I could possibly get the fabric at a later date I made a bee-line for the vintage textile stall. The stall was run by a lovely lady who does not yet sell to the UK online but was thinning out her workroom stash by selling pieces off at the fair. She had some lovely examples of machine and handmade lace from as far back as the Victorian period. She also had some vintage linens and fabric. Below is what I bought from her. I’m so happy with what I got. The small lace motifs I purchased separately, the rest, including the large embroidered white pillowcase at the bottom of the pile, came from two goody bags. Love every piece (even the dodgy coloured brown satin lining fabric!).

IMG_2163

IMG_2165

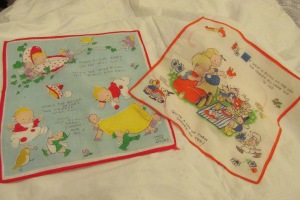
I almost forgot. I also purchased two Mabel Lucy Attwell 1930s handkerchiefs – adorable!

IMG_2162

Makit Lacemaking and Quilting Fair

I went today to the Makit Lacemaking and Quilting fair in my hometown Peterborough. It was quite a small fair and quite quiet which meant it didn’t quite have the excitement as the NEC, for example, but on the plus side it meant that it was quite a genteel shopping experience (no pushing or elbowing necessary). It lacked a bit of interest as there were not that many demonstrations and I couldn’t see any make-and-takes or workshop type areas. However, there were some interesting examples of textile art and I saw at least two stalls displaying their lace crafted jewellery which was at times stunningly dramatic and quietly elegant, I hadn’t seen anything like that before. The more traditional lace that had been made was gorgeous and I have huge admiration for those that can juggle the plethora of bobbins to create something so beautiful. I wanted to share photos of the event with you but people got a little funny about photos being taken despite me politely requesting and assuring them that I would cite their names next to their work, but I respect their decision.

Some of the quilted pictures and applique art was remarkable ranging from traditional landscapes to contemporary pieces and I could stare for hours and still not grasp all the detail of the pieces. I was desperately trying to take-in how each piece had been layered and sculpted out of thread and fabric. One quilted picture was of a black cat sitting in a bath and was almost photographic, as if it was a photo staged for a calendar, indeed, the artists comments stated that photo manipulation was technique she used. I so want to try that as although it was like a photo it was a unique piece of art in its own right independent of the photo that inspired it. The thread-work on that cat picture was more minimalistic and subtle than many of the other pictures with most of the work being done by the beautifully designed and crafted applique. The piece was designed by Jan Moore and was entitled Silver.

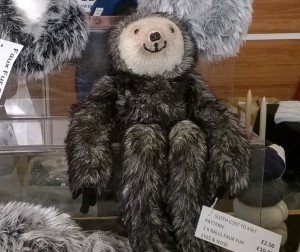
There was a gorgeous knitted sloth that I fell in love with but I am not a competent knitter so I could not make him. I was going to buy the pattern to send to my Great Aunt but they only sold the kits. The fluffy sloth was presented by http://www.thewoolshopleeds.co.uk but I’ve checked their site and he’s not on there yet.

Sloth

Vintage Style bag and Brooch

This is a bag made over the weekend. The bag itself is very simple but I thought I’d try making a few simple bags in different tones and then embellishing them with removable and interchangeable brooches. The first brooch I made was this rosette style one. The brooch can be used as a brooch or as a bag embellishment. I have embellished some plain bags (especially clutches) before using vintage metal brooches and I thought I’d see how it would work if I applied it to bags and brooches that I have made myself.

IMG_2161

Oil Cloth/PVC

This is my first make using oil cloth or PVC material (sorry my lack of knowledge makes me to tell the difference or know if there is a difference). I found the material in an off-cuts bin for £1.50 so I thought why not start my first oil cloth make with that because if I screw it up I haven’t lost much. I measured it all up myself and added gusseted sides for the first time. I didn’t really have proper handles so that part wasn’t ideal. I didn’t have the energy to crease and flatten handles made from the oil cloth/PVC. I didn’t realise how much effort it would take to crease the oil cloth/PVC where I wanted despite the fabric creasing everywhere I didn’t want it to. So here it is:

IMG_2143 IMG_2140